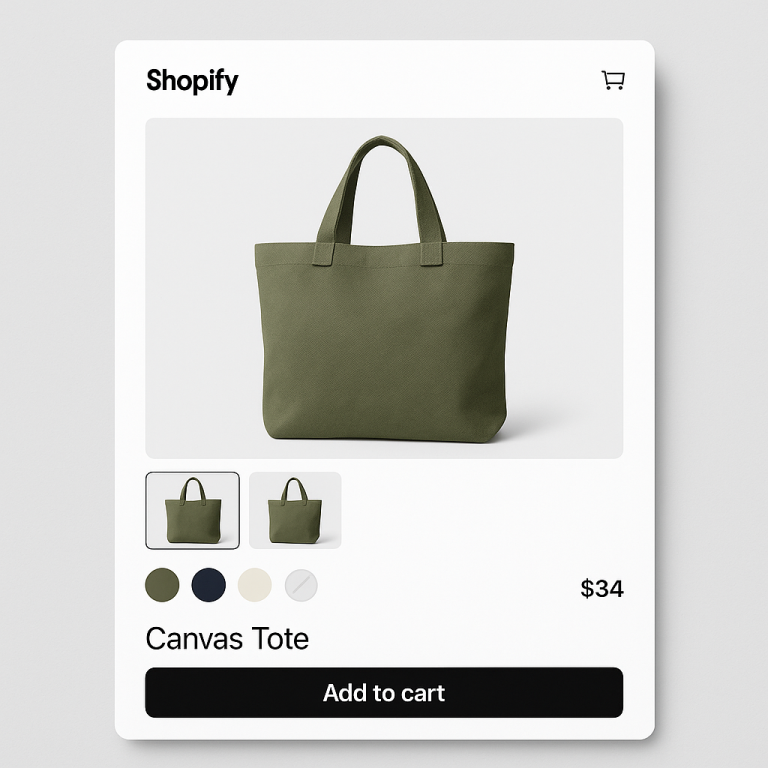
You have a product with 20 color options. All 20 swatches appear in one long row. Customers scroll through them trying to find what they want. Some give up and leave.
Categories fix this. Rubik Combined Listings lets you split your swatch row into labeled groups. “Warm Colors” and “Cool Colors.” Or “Cotton” and “Silk.” Or “Spring 2026” and “Winter 2026.” Each category gets a header label, and customers can scan the groups to find what they want in seconds.
In this post
- What categories do
- Managing categories through metaobjects
- Show category headers toggle
- Vertical spacing between categories
- Use cases for categories
- Works with grid and carousel layouts
- Step-by-step setup
- Video walkthrough
- Frequently asked questions
- Related reading
What categories do
Without categories, all your combined listing swatches appear in a single flat row or grid. 5 swatches is fine. 10 is manageable. But 20 or 30 swatches in one row becomes a wall of tiny circles or squares. Customers cannot scan them quickly, and the visual clutter pushes important content further down the page.
Categories split that flat row into labeled sections. Each section gets a text header like “Earth Tones” or “Metallics.” The swatches within each category group together visually, with spacing between groups. Customers see the category labels and jump to the section they care about instead of scanning every single swatch.
Think of it like a restaurant menu. A long list of 50 dishes is hard to read. But when you split them into “Appetizers,” “Mains,” and “Desserts,” customers find what they want fast. Categories do the same thing for your swatch rows.
Managing categories through metaobjects
Categories in Rubik Combined Listings are managed through Shopify’s metaobject editor. This means you work with them directly in your Shopify admin, not in a separate app interface. The setup uses Shopify’s native infrastructure, so your category data is stored in your shop’s metafields and loads with the page.
Each category is a metaobject entry with a name (the header text) and a list of products that belong to it. You assign products to categories by selecting them in the metaobject editor. A product can only belong to one category within a group. If you do not assign a product to any category, it appears outside the categorized sections.
The metaobject approach means categories work with Shopify’s existing data model. There is no proprietary database or external service involved. Your category structure travels with your shop data and is accessible through the Shopify API if you ever need to manage it programmatically. To understand how this fits into the broader combined listings setup, see the step-by-step setup guide.
Show category headers toggle
The Show category headers toggle controls whether the category name appears above each group of swatches. When enabled, customers see text labels like “Warm Colors” or “Linen Blends” above the relevant swatches. When disabled, the visual grouping through spacing still applies, but the text labels are hidden.
Why would you disable headers? Sometimes the spacing alone is enough. If your categories are obvious from the swatch visuals (all blues together, all reds together), the labels might feel redundant. Disabling headers gives you a cleaner look while still benefiting from the organizational spacing.
The header text styling is controlled through CSS variables. You can adjust the font size, font weight, color, and text transform. Make the headers bold and uppercase for strong visual separation, or small and subtle for a minimal look. The swatch customization guide covers all the CSS variables available for styling.
Vertical spacing between categories
The gap between category groups is adjustable. More spacing creates clear visual separation between sections. Less spacing keeps things compact.
This is especially important for mobile. On a phone screen, too much vertical spacing pushes the add-to-cart button further down. Too little spacing makes the categories blend together. You can set different spacing values for desktop and mobile using Rubik’s responsive contexts, so the layout adapts to each screen size.
The spacing works in combination with the header labels. When headers are enabled, the spacing appears above the header text. When headers are disabled, the spacing appears directly between the last swatch of one category and the first swatch of the next.
Use cases for categories
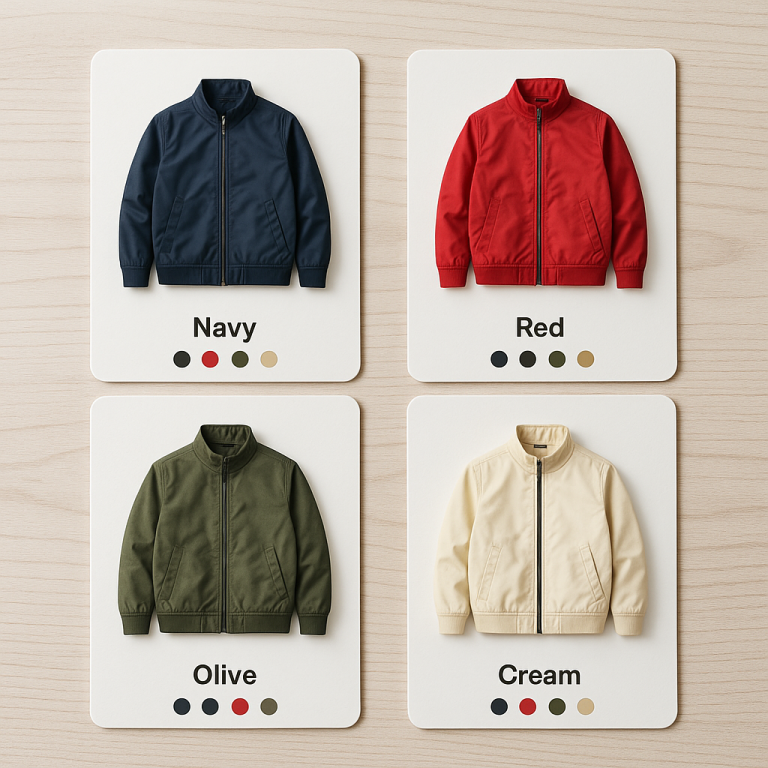
Warm and cool colors. A clothing brand with 16 color options splits them into “Warm Colors” (red, orange, yellow, coral, terracotta) and “Cool Colors” (blue, navy, teal, mint, lavender). Customers who know they want a warm tone skip straight to that section.
Material types. A furniture store offering the same sofa in multiple fabrics uses categories like “Linen,” “Velvet,” and “Leather.” Each category shows swatches for the colors available in that material. This helps customers narrow down by material first, then color. For tips on making swatch colors match the real product, see how to fix color swatch accuracy on CraftShift.
Seasonal collections. A store that drops new colors each season uses categories like “Spring 2026” and “Core Colors.” New arrivals get their own section at the top, while permanent options sit below. When the season changes, you update the category assignments in the metaobject editor.
Price tiers. A brand with standard and premium options uses categories like “Standard” and “Premium.” The premium swatches might show different materials or finishes. Customers see the tier distinction immediately without clicking into each option.
Brand collaborations. A store selling the same product in co-branded colorways uses categories like “Nike x Stussy” and “Nike Originals.” Each collaboration gets its own swatch section with a clear header.
Works with grid and carousel layouts
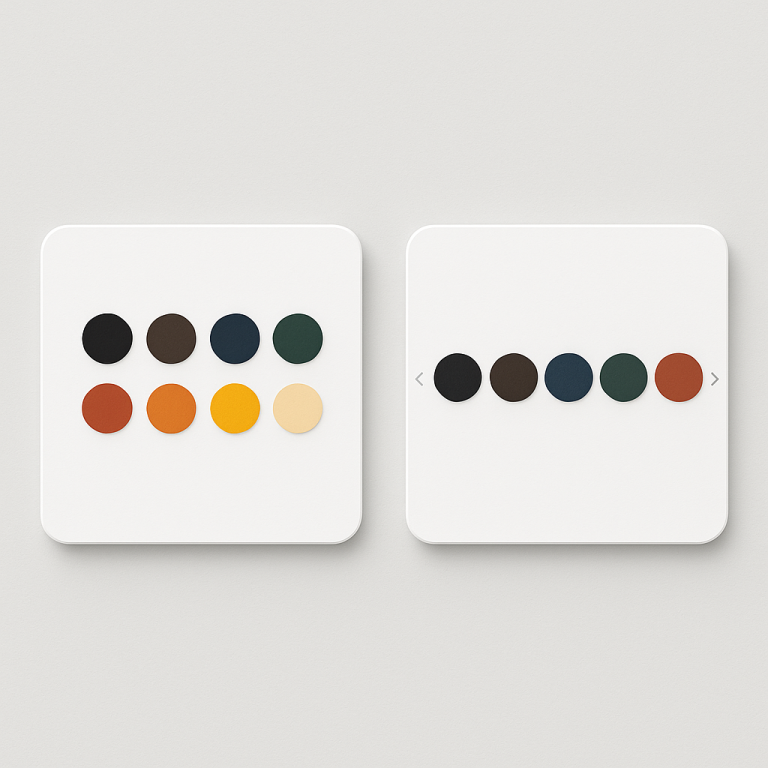
Categories work with both of Rubik’s layout modes. In grid layout, each category becomes its own grid section. The header sits above the grid, and the swatches wrap within that section. If you use “Limit to one row” with a max visible count, the “+N more” overflow indicator appears per category.
In carousel layout, each category gets its own carousel. Customers swipe through the swatches within a category independently. The navigation arrows appear per category carousel, and they auto-hide when all swatches fit without scrolling. This means a category with 3 swatches shows them all without arrows, while a category with 12 swatches gets carousel navigation.
The layout choice depends on how many swatches each category has. If categories are small (3-5 swatches each), grid is usually better. If categories are large (10+ swatches each), carousel prevents the page from becoming too tall. You can learn more about choosing the right layout in the grid vs carousel layout guide.
Step-by-step setup
- Create your combined listing group. If you have not already, group your products in Rubik Combined Listings. Each product in the group becomes one swatch.
- Open the metaobject editor. In your Shopify admin, go to Content > Metaobjects. Find the Rubik category metaobject definition.
- Create category entries. Add a new metaobject entry for each category. Give it a name (this becomes the header text) and assign the products that belong to it.
- Enable category headers. In the Rubik swatch style editor, turn on Show category headers if you want the labels to appear on the storefront.
- Adjust spacing. Set the vertical spacing between categories using the CSS variable or the visual editor. Check both desktop and mobile previews.
- Save and preview. Check the product page on your storefront. Swatches should appear grouped by category with headers and spacing.
If a product is not assigned to any category, it appears in an “uncategorized” section. You can assign it later without affecting the other categories. For questions about the overall combined listings workflow, check the combined listings FAQ.
If you also need to filter variant images on product pages (separate from combined listings), Rubik Variant Images handles that as a separate app focused on gallery filtering and per-variant image assignment.
Video walkthrough
See categories in action, including header labels, spacing, and how they work with grid and carousel layouts:
Demo store | Docs | Knowledge base
Frequently asked questions
What are categories in Rubik Combined Listings?
Categories split your swatch row into labeled groups. Instead of 20 swatches in one flat row, you get sections like “Warm Colors” and “Cool Colors” with header labels and spacing between them.
How do I manage categories?
Through Shopify’s metaobject editor. Each category is a metaobject entry with a name and a list of assigned products. You create and edit categories directly in your Shopify admin under Content > Metaobjects.
Can I hide the category header labels?
Yes. The Show category headers toggle controls header visibility. When disabled, the visual grouping through spacing still applies, but the text labels are hidden.
Do categories work with carousel layout?
Yes. In carousel mode, each category gets its own independent carousel with separate navigation arrows. Customers swipe through swatches within each category independently.
What happens to products not assigned to a category?
They appear in an uncategorized section outside the defined categories. You can assign them to a category at any time without affecting the rest of the group.
Is there a limit on the number of categories?
No hard limit. You can create as many categories as you need. However, too many categories with few swatches each can look fragmented. Most stores use 2-5 categories per product group.
Related reading
- How to customize combined listing swatches
- Shopify combined listings FAQ
- How to set up combined listings on Shopify
- Grid vs carousel layout for combined listing swatches
- Shopify combined listings explained
- How to fix color swatch accuracy on Shopify (CraftShift)
- Rubik Variant Images FAQ (Rubik Variant Images)